Thursday, April 29, 2010

And So We Begin Again

Shown after finishing yoke and upper sleeves, laying on a current sweater that fits me well.
Beginning the right front section:
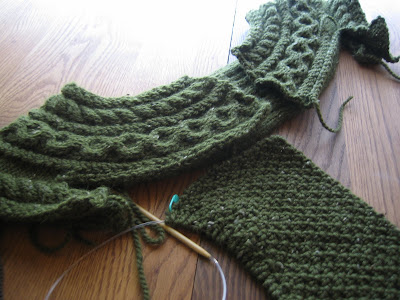
So... beginning again on Helleborus Yoke sweater, I have decided to go down to a size 9 needle and do the yoke separately. Here is a side by side view of the OLD yoke front (right) next to the NEW yoke front (left). See the difference?: Here shown with beginnings of sleeve and the yoke on a stitch holder.

The plan is, to use a current sweater that fits me, as a "model" to plan this sweater's dimensions. I think it will work out much better on the smaller needle size. And I am also doing the size 38 this time, instead of the 43.5. That combined with a smaller needle size should help me out to get a closer fit. Looks like I will knit the fronts and backs and attach to the yoke. Was going to pick up and knit "down" but decided not to. I may be able to do it seamless on the sides, however. Haven't decided yet. It's a work in progress...

Wednesday, April 21, 2010

Huge Helleborus Character Test

Oh such a shame, a crying shame! I don't know how I got so off gauge on this! I measured and measured my gauge, I made two swatches and yet...still it eludes me how I made this gargantuan of a Helleborus! I went for the size 43.5" and used the right size needles and followed the pattern to the letter.... It would almost make me laugh-except for the fact that I am just sick over it- because I was so excited to do this and get the right yarn and begin...and yet I have had more troubles with this one than any other sweater I've done. I think my husband is wondering: "Will she give up this time? What will it take for her to crack?" as he has watched me stumble my way through this supposedly easy- for- everyone- else -on -Raverly pattern! Ok, so the question is...either I totally rip it out and begin again or get really good at steeking and get creative and try to make seams where there should not be. I tried a gauge on a smaller needle last night as well. Believe me, this is not the fault of the designer. No, indeed. The pattern is clearly written. This is just a fluke of nature, just in time for Earth Day tomorrow! This is just a test of my true knitterly character. Am I going to give up and give in and throw it in the UFO or Ugh pile? No!
Do I have the get up and go to pick myself back up and keep going on this project? Even if it means ripping out hours upon hours upon hours of work? I have never had to "frog" a whole sweater before. It is a sad thought. I want to say "yes! I will begin again in a big way"...ZZZZzzz If I can just muster up the gusto to do those miles of moss stitch and cables once again. Oh, but the yarn is so pretty. It deserves to be knit up into this sweater.

Wednesday, April 14, 2010

To The Left Side of Helleborus

Made it to the left arm pit/sleeve of Helleborus, then will knit around the left front. Shown here with right front side, and part of a dangling sleeve and a dark view of the "back" in the mirror. Of course the side seams aren't seamed, the sleeves aren't finished, nor are the collar and buttonbands. All still yet to come.
But there is progress...bit by bit! If I can keep from making more mistakes. It is hard to rip out cabling and then get it back on the needle which I have had to do several times. More so than any other sweater, for some reason. It's not that it's so hard, you just have to be so careful what pattern row you are on and watch your increases/decreases/wraps and moss stitch all at the same time. I feel I am crawling along on this project compared to those who have done it in record time. Trying it on myself by draping over me, it seems very huge in the yoke. But again, the collar's not on and the sleeves aren't pulled in and seams aren't in. I hope that it fits me after all this work! If so, it will be so worth it. This yarn is sooo soft! The pattern is so pretty!

Monday, April 12, 2010

New Knitter Joins The Ranks


Nothing could be finer than teaching someone to knit and seeing them catching on to it the VERY FIRST try! Not that it's bad if someone doesn't catch on right away. It was just so quick and rewarding this way. You are a natural, Jean! It will be a great looking scarf very soon!

Tuesday, April 6, 2010

Celtic Coffee Break

We did another coffee exploration field trip today to the city of Redmond, WA. A friend of mine had recommended Victor's Celtic Coffee Co. After attempting to find another recommended roaster, Lusso Coffee Roasters, and discovering it apparently was not a walk in coffee shop, we put in our GPS coordinates for Victor's and after driving a bit, we found it! The coffee was very smooth and not bitter at all. We really enjoyed it. Though no "latte art" on top...and for that I was disappointed. They offered many Irish sounding coffee flavors as well as breakfast sandwiches and soup of the day. We had an egg/ham/cheese sandwich. Very nice!
The best part of all was when my husband discovered a wall of handknit sweaters, I kid you not!, right in the middle of the store near the restroom! I about knocked him over getting up to go look. Sure enough, a fellow knitter has her lovely handknit sweaters on the wall and posted next to them is her name, her email and her etsy shop site for all to see and order custom sweaters! I have always believed that knitting and coffee go hand in hand. This is proof for all to see!:

Sorry I don't have her name to include here, you will have to go see for yourself! :)
It was truly a great adventure getting a great latte, AND seeing handknit sweaters all in one fell swoop!
To top off our coffee "snob" experience for the day, my husband had his glass Chemex brewer arrive in the mail from Sweet Maria's Coffee Roasters. He ordered this along with the filters. It provides an "old style" purist form of brewing. Similar to the french press method, however different in a few ways. Allow me to demonstrate, for all you coffee lovers out there. First, you take the Chemex filter and fold it so one side has 3 layers and that is the side toward the spout:

Next you grind your coffee, which we are going to experiment with. You don't want it so fine that the coffee just sludges through too slowly, nor do you want it so coarse it runs too quickly.
We are going to try it out on a pretty coarse "french press" grind. About 1 rounded Tablespoon scoop per 5 oz. of water.

While that is getting ground, heat your water to boiling.

Important: You want to "wet" your filter with hot water, prior to brewing, which you can do over the sink and pour the water back into the sink. Your filter sticks to the glass and will not come back off when you pour off the water.

Here's our grind in the wet filter, ready to brew:


Once your water boils, take it off the heat for 30 sec. to let the temp. arrive at the recommended heat. Somewhere between 195-205 degrees F, the perfect brewing temperature.

Pour a small amount of coffee over the grinds, to let them swell or "bloom".

Fill the filter about 1/2 way, getting all the grinds wet in the process. After the first "wetting", pour slowly in a circular motion, keeping the coffee inward as compact as possible.
You can see how the coffee has "bloomed" in this photo:


Keep pouring in coffee at intervals until the desired amount of water has passed through the grounds. This took about 4 minutes, same amount of time as a french press method.


Dispose of the spent grounds by lifting the filter out of the coffeemaker (use for compost if desired).

We poured our brewed coffee into a stainless steel carafe so that it was kept hot, but not kept in the glass carafe. Keeping your coffee warm, but not on a burner will avoid the burned flavor.

And voila! A perfect cup of brewed coffee without the residue of old coffee oils, and cleaner than an auto-brewed cup. Apparently auto drip makers will brew at lower and lower temperatures over time, not being capable of brewing at the desired temperature consistently. Best of all, with this method, there is no "off" or bitter taste.

Aaahhhhhhhhh....Just makes you want to have a cup and knit, doesn't it?

Sunday, April 4, 2010

Happy Easter!

Happy Easter!I wondered about my "in progress" sweater's name, Helleborus. At a family gathering today, I saw a beautiful Helleborus plant. After googling, I discovered that the "Helleborus Orientalis" is known for its early blooming quality, around early spring. Generally around the time of the Christian season of Lent. Described as: plants that inject color into the otherwise dreary landscape and usher in spring, bestowing on it their stamp of approval. That makes me happy to know my sweater is named after such a gracious flowering plant. How timely that I am making it during Easter season and I hope to be finished with it in time to wear for spring.

Saturday, April 3, 2010

Turning the Corner on Helleborus

For all the great instructions, I have made more mistakes (my own doing) on this sweater than any other I have attempted! Shown here a bit upside down, with the sleeve now attached to the yoke. I failed to catch on to how that sleeve attached the first time. I read "continue on 49 yoke cable rows" and then "finish sleeve" as "leave the sleeve alone". Apparently I wasn't supposed to leave the sleeve alone, I was supposed to keep working it with the 49 cable rows (which now seems in hindsight like a big DUH!) I got around the bend and then saw I had made a mistake on the yoke cabling...so my biggest fear is ripping out cabling. But Rrrripppp it went and I was able to redo that also. I am usually really good at reading patterns, but I think the cabling and sideways construction and moss stitch and wraps all combine for a bit of a medium size challenge to my brain. It's good to be challenged with every new knit project you do. You learn something new. I am determined to do this beautiful little sweater! I will cherish it all the more after the work put into it.