Showing posts with label cables. Show all posts

Tuesday, January 10, 2012

Snowy Chocolate Owls Sweater

Given my recent liking for owls, this sweater seemed like the obvious next project to do, along with hundreds of other Ravelry folks who have gone before me...Mine is in Ecological Wool, two skeins of a very dark brown, on size 10 needles. I'm doing the body on circulars from the bottom up, as directed in the pattern. The sleeves are knit separately and I'm doing those on size 10 dpn's. They will be attached to sweater body and the yoke will be knit upward. The fun part is coming...knitting the cute owls! This is going to be a really cute sweater!
Owls, by Kate Davies:


Snow days can be very, very productive, indeed!!

Saturday, January 8, 2011

Green Day Vest

And here's the finished Green Day Vest -The pattern was free on Ravelry.
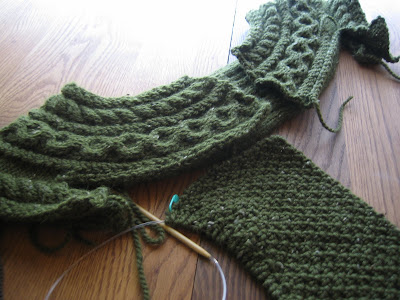
Of course I haven't really blocked it yet. I can never wait for that! This vest fit the bill for using my Irish wool. I had been saving this wool since my trip to Dublin Bay Knitting Company a few years ago. Wanting something with cables, just waiting for the right pattern. I thought maybe a vest without sleeves so I wouldn't get too warm. This vest will always remind me of our trip down to Portland, where we discovered the culinary delights of eating out there. And our little trolley trip to the Pearl District with my patient friends, who browsed in a card shop while I bought this yarn. The neckline is deeper than some vests. That could be adjusted by starting later on the neckline decreases. Used size 8 needles for body, size 6 needles for ribbing and my beloved stash of Aran Wool from Kerry Woollen Mills. Modified by adding a nice buttonband to front. I learned the 3- needle bind off method (a link below in my text), and had fun with slipping stitches and passing them over. I do like the one-row button hole for a tidy buttonhole method. (link below in text)

Stages of the Green Day Vest:
Interesting hemline with a twisted knit stitch every third row.


Ribbing across the back is a P2K6. I omitted the called-for side cables from armhole to hem.Working the cable pattern up the front. It's popping out nicely.Showing the piece layed out with the back in the "middle". Stitches are put on hold on the fronts while you work up the back and bind off the armholes and neckline.Neckline stitches are decreased after completing the cable and then fronts are knit upward to "meet" the back. Shoulder seams are made using the 3 needle bind off method. Very easy and very clean way to seam the shoulders.Stitches are picked up around the neckline using size 6 needles. I picked up 120 stitches total. Then worked 8 rows of K2P2 rib, and bound off on WS. Next I picked up 48 stitches for each front buttonband and did 8 rows of K2P2 rib. I made six one row buttonholes 4 stitches apart. These are the nicest finished buttonholes I have ever done. The U-Tube tutorial is easy to follow. Lastly, I will pick up some stitches around the armholes for another little ribbed edge, then get some buttons on and try to block this one a bit! Then it will be time to wear!

Thursday, December 30, 2010

A Tweedy New Year


I've had this Aran wool from Kerry Woollen Mills that I got at Dublin Bay Knitting Co. in Portland, OR awhile back. I have been saving it up to do an Irish tweedy vest of some sort. Here is my first try at doing one. The pattern: Bramblewood. I found the yarn to be very scritchy and stiff. I tried spraying with water and blocking out a bit to see if it would change and "bloom" a bit, and I think it would. Then as I went along, it just didn't seem the cables were "popping" out as they should so I am not sure I want to continue this vest,as the cables are on both back and front sides.
Though I do love this pattern...


They show up a bit more on the top section, as that is what I sprayed and tried to block, poke and prod the cables to come out a bit. I have set this one aside for now.

Instead I found an easy Green Day vest pattern that I am trying since I have plenty of the yarn to begin again. And maybe it will be easier to work with this new pattern.


It has a twisted knit row every third row on the hemline. It calls for other cables to run from underarm to hem on the sides, however I am omitting those cables.


I'm liking it so far...It's very cold out here and nice to be working with tweedy wool.
Happy Knit Year!

Thursday, September 2, 2010

Second Best Friend

Just in time for the chill in the air that means fall is here...I can almost taste a pumpkin spice latte, can't you?

Edited to add a few photos of the finished Best Friend Cardigan. Pattern by: Wenlan Chia
Size 19 needles. 3 skeins Thick and Chunky Wool Ease in "Spice". This one's very warm and soft. The large actually ended up fitting me. Still haven't blocked it, but that's typical of me! I can never wait to wear things when I finish them. Arm seams a bit bulky. All in all, it came out cute!


What's better than a Best Friend? A Second Best Friend! OK, so the lilac was a trial run, remember? Besides, I am waiting for buttons and can't wear that one yet. I am a fickle friend and am already on to the next chunky bulky one. This one is the real deal weight called for in the pattern. Using big needles, size 19. Talk about fast knitting. This thing could knit itself in a day. I am not even kidding! FAST!


It's sort of a spicy pumpkiny fall color. Whadya know? It's called "Spice". I got 4 skeins of Thick and Quick Wool Ease. A blend of lamb's wool and (gasp!) acrylic. I know, I know. I have used the blends in the last two boleros which didn't turn out half bad. There is not alot of stretch to acrylic, but it was bulky and so there you have it.

It crunches up rather smallish right now and I hope it is going to S-T-R-E-T-C-H on me with those big stitches when I put it on! Or when I block it. I did not do the bobbles. Didn't want to. I did not do buttonholes. Others said they were not needed due to the big stitches. I did not do the waist decreases as others recommended not to. I added a few rows of the ribbing on the waist. Other than all that, I don't think I modified anything. I know, amazing the "Mod Squad" did not do too many more "mods" this time. I made the large. It doesn't look very large yet.


Friday, August 20, 2010

Friends Can Be Fickle


So I started the Best Friend Cardigan out of Wenlan Chia's book. It is a free pattern on Ravelry. I just got the book from the library for fun...and then I went off with another project for awhile. And now I'm back again. Just like a fickle friend I guess. Now it isn't so hot outside, so it's back to knitting with wool. I am not really sure about this project yet, ....not sure about the color. The color lilac is so...lilac. But the pattern is sort of funky and fun. So it deserves a fun color. I am considering this my "test knit". I have gotten some other chunky yarn to use to make another one if I like how this turns out. So I figure this is my practice run. I have heavily modified this pattern to fit my yarn gauge and my needle size was dropped down from pattern recommended size. So now it doesn't resemble the original pattern a whole lot. As in, the original only has maybe 4 cable repeats up the front and is on way chunkier yarn and huge needles, but this is good practice! Upside down -not sure why?-photo (above) of one side or front of the sweater. Lower photo shows how this pattern was written. It is knit from the bottom up and side to side, then you leave the sides on holders, knit the back upwards, and then put the neck on a holder. Then you go back to put the front pieces on the needles and knit upward, keeping the pattern going, as well as buttonholes. I did mine so I'll end up with six buttonholes up the front. I have many more cable pattern repeats than the pattern, again, due to my yarn, gauge and needle size.

See how it looks all opened up? (above) Now I will fold it in so you can see what it might look like for real. (below)


I am now knitting up the other front side, then I will bind off at the neck. Then I think it will be time to do the sleeves. Some other people who have knit this pattern have done the sleeves in the round. They are written in the pattern to have a cap and be knit in with seams. I'll see what I feel like doing when I get to it. This is an experiment for me in gauge and stitch count and fudging.

After the sleeves will be time to finish off the neck and do some buttons and blocking. I could buy buttons or make them by doing a crochet-covered button, depending on what I want to do at the time. Hm...not sure if I can commit to this Best Friend yet. My daughter said, "It's very PURPLE." Thank you, honey. I know. It is. Maybe purple is the season's "new black". I have nothing against purple. I look good in purple. Many friends of mine love purple. (Julie or perhaps Christine?) It's just not my all-time favorite, not my very bestest friend color. Not yet, not this week. Maybe next week.

Sunday, May 16, 2010

Helleborus...Finally!

 Edited to add photos after deciding to put on the collar and fix the buttonband. End result, the collar is a challenge and I can see why many mentioned this in their project notes. I decided that (as you can see in photo below of me wearing it with the collar up)...that it just didn't fit right. My wonderful idea was to taper the buttonband by decreasing one stitch at the top every other row, an idea I got from another knitter. I picked up only 60 stitches this second time around for the buttonband. Much better! My other great idea was instead of fighting the collar and it's floppiness around the neck and its unwillingness to lay down the right way: FOLD it over ! Voila! Problem solved. It is now a shawl collar sweater! Ta Da!


I think it's finally done! The only part I didn't do was add the collar. And I am thinking about holding off on it, or maybe not even adding it at all and leaving as is. Shown before any blocking in a photo shoot by my husband this afternoon:


Did a few mods. This is my second time around knitting the sweater and this fits much better than the first which was done on 10 1/2 circs. This was done more like the size 38 in the pattern. Modified by using another sweater as my "model," so my row counts differ a bit from pattern. Knit on size 9 circulars for right, left front, and back pieces. Yoke was knit separately and other pieces seamed to the yoke. (Pattern calls for it to be knit as one piece side to side) Then picked up stitches at the bottom using size 8's to do 12 rws. garter stitch. Then seamed the sides. Finished sleeves using size 8 circ's by picking up stitches and knitting in the round the rest of the way down. Buttonholes moved slightly over so not so close to edge, otherwise followed pattern for picking up 78 sts. using size 8's for buttonbands. So many people seem to have had probs doing the collar and I am not sure I want one yet...so for now, I will let it rest!
I learned alot about knitting a garment "sideways" and about "correct gauge" and about "winging" it, alot about "tenacity" and "stick-to-it-ness" with this project. I surprised myself with the determination with which I pursued the very yarn pictured in the book, and was blessed to find the yarn in two separate states in the same dyelot! And I learned that if at first you don't succeed, please do try, and try again! The end result will be worth it!

Friday, May 14, 2010

Nearing the Finish on Helleborus

This is one of those cases where perseverance will pay off! On to the finishing stages of Helleborus Yoke Sweater. Shown here after seaming sides, and picking up along bottom edge to do 12 rows of garter stitch, before finishing sleeves. A close up of one sleeve:
Next will be the picking up of stitches along the fronts for the button bands. And then the big decision about the collar. Whether to add one or not. This 2nd version of Helleborus fits much better than the first, and the alpaca makes it stretchy and forgiving as well. I will press on to the finish!

Thursday, April 29, 2010

And So We Begin Again

Shown after finishing yoke and upper sleeves, laying on a current sweater that fits me well.
Beginning the right front section:
So... beginning again on Helleborus Yoke sweater, I have decided to go down to a size 9 needle and do the yoke separately. Here is a side by side view of the OLD yoke front (right) next to the NEW yoke front (left). See the difference?: Here shown with beginnings of sleeve and the yoke on a stitch holder.

The plan is, to use a current sweater that fits me, as a "model" to plan this sweater's dimensions. I think it will work out much better on the smaller needle size. And I am also doing the size 38 this time, instead of the 43.5. That combined with a smaller needle size should help me out to get a closer fit. Looks like I will knit the fronts and backs and attach to the yoke. Was going to pick up and knit "down" but decided not to. I may be able to do it seamless on the sides, however. Haven't decided yet. It's a work in progress...