Showing posts with label knitting. Show all posts

Thursday, July 8, 2010

Time for Gelato!

Baby "Gelato" Garter Stitch Jacket is complete and being modeled by Matilda, our bear who was a wedding gift 27 years ago and traveled the coast with us on our honeymoon. Since no babies live here, I had to find a suitable "stand-in."


(Edited to add these pics in the daylight! Poor little sweater is not quite dry and the wind was twirling it around a bit, but hub caught it finally. I know it looks big here hanging in the air. It is the 6/9 mos. size)
Well it was time for a trip to Trader Joes to get some lemonade, avocadoes and their fantastic tiny sugar plum tomatoes. They taste like candy, seriously. We are in the middle of a regular Seattle heat wave, breaking records today. No AC in our house means it's a toasty 82 degrees inside right now. Whew! So, what better time to try out some gelato flavors. On the left we have Villa Dulce Mint and Chip. Very delish! And then there's the local folks of Snoqualmie Gourmet ice cream who put out this snazzy gelato flavor, Raspberry Honey. You can really taste the honey on the "finish". Very refreshing!
Now, my Drops Garter Stitch Baby Jacket is complete with buttons and is ready to be blocked. I think I shall name it "Gelato", in honor of the occasion. There is a hint of pink and sort of a dark mauve so I went with little flower buttons that looked whimsical and funky.
Shown before blocking, below:

And shown here, blocking. Should dry quickly in this weather. Better pic to follow, I'm sure, when we are back to daylight.

Again, this was knit from side to side, on size 2 needles, using fingering weight yarn. (like you would use for socks) The pattern was a free Drops pattern.
I did the 2nd size and used 4 skeins Aslan Trends, Sante Fe -merino wool/polyamide. I have enough of the 4th leftover probably for some little item. I chose to do only 3 buttons at the top. Machine washable, cold water, dry flat. How about that? I still can't believe that. So I hand washed it and then spun out the excess water a bit in the washer. Funky...whimsical!

Tuesday, July 6, 2010

Drops Jacket Sees Mt. Rainier

Coming upon the home stretch of the Drops Baby Jacket. One side left to finish with buttonholes. Then seams only from armpit to cuff! Today the fortunate Drops Jacket got to visit Mt. Rainier on a trip to my sister's in Edgewood, WA.


Saturday, June 19, 2010

Drops Garter Stitch Baby Jacket Goes Camping

Part 2: The Drops Baby Jacket gets to go camping in the RV this week in search of sun! It got to ride many miles east to get to our campground...It got to see lovely views, a deer and wildflowers... And these pretty pink tipped leaves...
I got lots of knitting time out in front of the RV... while intermittently swatting at huge ants! And then I moved into the RV away from them, though some found their way inside. EW.


Taking a break for a walk over the creek...


Knit sideways and finished one sleeve, now on to knitting the back. (Which is unseen because it is under the front of course!) Sleeve is "folded" for picture, and will have a seam from armpit to wrist.

Yes, the b16-3 Drops Jacket (which should be called something more exciting than that, seriously. We need to rename this thing) has seen all these things and more. And I have seen miles and miles of garter stitch that never ends. But it is turning out very cute! And I will excuse the big ants from crawling on my arm while knitting just this once.
Part 1: Beginning the jacket. Once, twice....
Shown here with no flash. Top of the jacket is tapered,while body flares out. Side of the body is on a stitch holder while I work the first sleeve (out to the left) Once left sleeve is knit, then I will continue on knitting the body and across the back. Actually this is the left front and right sleeve, I found out later. After reading the pattern again.

Using a fingering weight Santa Fe merino wool/polyamide blend, on size 2 needles. This baby jacket is knit in garter stitch sideways all the way around, making vertical stripes as it goes. It uses "short rows" both on the body and the sleeves to make it flare out. I "oopsed" a few times on the short rows. Ripped out once. It's really a very easy pattern. You just have to watch the short row sequence carefully. I apparently wasn't. Easy, really!
A free pattern found on Ravelry, the "b16-3 Drops Jacket", is a cute one (with a rather boring name) Though the garter stitch goes on and on forever. And one bonus of this yarn, it is machine washable in cold water. So maybe I won't feel so badly handing it to a new mother and saying "hand wash, dry flat". Maybe I can say, "Machine wash cold, gently, dry flat". Sounds a bit easier, eh?

Friday, May 21, 2010

The Joy of Gifting

This week I had the joy of seeing one happy little 3 mos. old baby girl wearing my first ever "gifted" Baby Surprise jacket and her first smiles at the same time. It choked me up! I will post the pic of me holding her as soon as I receive it from her mom's camera.
I also got to give a beautiful, expectant mommy the first Baby Surprise jacket I ever knit which will be for her soon to be born first son... How rewarding it was to give something handknit away and to know it will be worn by a cute little person soon!

Sunday, May 16, 2010

Helleborus...Finally!

 Edited to add photos after deciding to put on the collar and fix the buttonband. End result, the collar is a challenge and I can see why many mentioned this in their project notes. I decided that (as you can see in photo below of me wearing it with the collar up)...that it just didn't fit right. My wonderful idea was to taper the buttonband by decreasing one stitch at the top every other row, an idea I got from another knitter. I picked up only 60 stitches this second time around for the buttonband. Much better! My other great idea was instead of fighting the collar and it's floppiness around the neck and its unwillingness to lay down the right way: FOLD it over ! Voila! Problem solved. It is now a shawl collar sweater! Ta Da!


I think it's finally done! The only part I didn't do was add the collar. And I am thinking about holding off on it, or maybe not even adding it at all and leaving as is. Shown before any blocking in a photo shoot by my husband this afternoon:


Did a few mods. This is my second time around knitting the sweater and this fits much better than the first which was done on 10 1/2 circs. This was done more like the size 38 in the pattern. Modified by using another sweater as my "model," so my row counts differ a bit from pattern. Knit on size 9 circulars for right, left front, and back pieces. Yoke was knit separately and other pieces seamed to the yoke. (Pattern calls for it to be knit as one piece side to side) Then picked up stitches at the bottom using size 8's to do 12 rws. garter stitch. Then seamed the sides. Finished sleeves using size 8 circ's by picking up stitches and knitting in the round the rest of the way down. Buttonholes moved slightly over so not so close to edge, otherwise followed pattern for picking up 78 sts. using size 8's for buttonbands. So many people seem to have had probs doing the collar and I am not sure I want one yet...so for now, I will let it rest!
I learned alot about knitting a garment "sideways" and about "correct gauge" and about "winging" it, alot about "tenacity" and "stick-to-it-ness" with this project. I surprised myself with the determination with which I pursued the very yarn pictured in the book, and was blessed to find the yarn in two separate states in the same dyelot! And I learned that if at first you don't succeed, please do try, and try again! The end result will be worth it!

Friday, May 14, 2010

Nearing the Finish on Helleborus

This is one of those cases where perseverance will pay off! On to the finishing stages of Helleborus Yoke Sweater. Shown here after seaming sides, and picking up along bottom edge to do 12 rows of garter stitch, before finishing sleeves. A close up of one sleeve:
Next will be the picking up of stitches along the fronts for the button bands. And then the big decision about the collar. Whether to add one or not. This 2nd version of Helleborus fits much better than the first, and the alpaca makes it stretchy and forgiving as well. I will press on to the finish!

Thursday, April 29, 2010

And So We Begin Again

Shown after finishing yoke and upper sleeves, laying on a current sweater that fits me well.
Beginning the right front section:
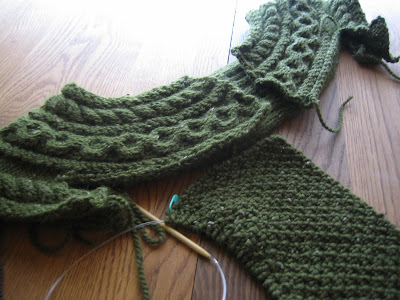
So... beginning again on Helleborus Yoke sweater, I have decided to go down to a size 9 needle and do the yoke separately. Here is a side by side view of the OLD yoke front (right) next to the NEW yoke front (left). See the difference?: Here shown with beginnings of sleeve and the yoke on a stitch holder.

The plan is, to use a current sweater that fits me, as a "model" to plan this sweater's dimensions. I think it will work out much better on the smaller needle size. And I am also doing the size 38 this time, instead of the 43.5. That combined with a smaller needle size should help me out to get a closer fit. Looks like I will knit the fronts and backs and attach to the yoke. Was going to pick up and knit "down" but decided not to. I may be able to do it seamless on the sides, however. Haven't decided yet. It's a work in progress...

Wednesday, April 21, 2010

Huge Helleborus Character Test

Oh such a shame, a crying shame! I don't know how I got so off gauge on this! I measured and measured my gauge, I made two swatches and yet...still it eludes me how I made this gargantuan of a Helleborus! I went for the size 43.5" and used the right size needles and followed the pattern to the letter.... It would almost make me laugh-except for the fact that I am just sick over it- because I was so excited to do this and get the right yarn and begin...and yet I have had more troubles with this one than any other sweater I've done. I think my husband is wondering: "Will she give up this time? What will it take for her to crack?" as he has watched me stumble my way through this supposedly easy- for- everyone- else -on -Raverly pattern! Ok, so the question is...either I totally rip it out and begin again or get really good at steeking and get creative and try to make seams where there should not be. I tried a gauge on a smaller needle last night as well. Believe me, this is not the fault of the designer. No, indeed. The pattern is clearly written. This is just a fluke of nature, just in time for Earth Day tomorrow! This is just a test of my true knitterly character. Am I going to give up and give in and throw it in the UFO or Ugh pile? No!
Do I have the get up and go to pick myself back up and keep going on this project? Even if it means ripping out hours upon hours upon hours of work? I have never had to "frog" a whole sweater before. It is a sad thought. I want to say "yes! I will begin again in a big way"...ZZZZzzz If I can just muster up the gusto to do those miles of moss stitch and cables once again. Oh, but the yarn is so pretty. It deserves to be knit up into this sweater.

Wednesday, April 14, 2010

To The Left Side of Helleborus

Made it to the left arm pit/sleeve of Helleborus, then will knit around the left front. Shown here with right front side, and part of a dangling sleeve and a dark view of the "back" in the mirror. Of course the side seams aren't seamed, the sleeves aren't finished, nor are the collar and buttonbands. All still yet to come.
But there is progress...bit by bit! If I can keep from making more mistakes. It is hard to rip out cabling and then get it back on the needle which I have had to do several times. More so than any other sweater, for some reason. It's not that it's so hard, you just have to be so careful what pattern row you are on and watch your increases/decreases/wraps and moss stitch all at the same time. I feel I am crawling along on this project compared to those who have done it in record time. Trying it on myself by draping over me, it seems very huge in the yoke. But again, the collar's not on and the sleeves aren't pulled in and seams aren't in. I hope that it fits me after all this work! If so, it will be so worth it. This yarn is sooo soft! The pattern is so pretty!

Monday, April 12, 2010

New Knitter Joins The Ranks


Nothing could be finer than teaching someone to knit and seeing them catching on to it the VERY FIRST try! Not that it's bad if someone doesn't catch on right away. It was just so quick and rewarding this way. You are a natural, Jean! It will be a great looking scarf very soon!

Saturday, April 3, 2010

Turning the Corner on Helleborus

For all the great instructions, I have made more mistakes (my own doing) on this sweater than any other I have attempted! Shown here a bit upside down, with the sleeve now attached to the yoke. I failed to catch on to how that sleeve attached the first time. I read "continue on 49 yoke cable rows" and then "finish sleeve" as "leave the sleeve alone". Apparently I wasn't supposed to leave the sleeve alone, I was supposed to keep working it with the 49 cable rows (which now seems in hindsight like a big DUH!) I got around the bend and then saw I had made a mistake on the yoke cabling...so my biggest fear is ripping out cabling. But Rrrripppp it went and I was able to redo that also. I am usually really good at reading patterns, but I think the cabling and sideways construction and moss stitch and wraps all combine for a bit of a medium size challenge to my brain. It's good to be challenged with every new knit project you do. You learn something new. I am determined to do this beautiful little sweater! I will cherish it all the more after the work put into it.

Friday, March 26, 2010

Never Fear the Wraps-Front Side Helleborus

A glimpse so far of progress on Helleborus Yoke Sweater. This sweater has side to side construction beginning with the right front side. You are knitting the body and the yoke simultaneously and working your way to the underarm. You are following a cable pattern for the yoke, as well as doing a moss stitch for the body, all the while watching your row count for your increases, and then throwing in a few wraps and short rows to make it really exciting. It helps to write it all down! This is the first time I have done "wraps" and short rows for shaping. I have watched a few tutorials and have found them to be helpful in visualizing wraps and what their purpose is, as well as how to do them. I am still catching on to the technique as well as how to do the knitting on the rows following the wraps in order to close up the "hole" that wraps make. I looked at Knittinghelp.com as well as Techknitter (see links to right) as well as googled "knitting wrapped stitches" to find more tutorials. Every project it seems I learn a new skill or technique. Isn't that the great thing about knitting? We can be a fearless knitters!

Monday, March 22, 2010

Tweedy Alpaca Has Arrived!

A package arrived in the mail today. Could it be? Yes it was! My first 8 skeins of Tweedy Alpaca. Oh, Happy Day! So now I can make this... out of this!...
Let the casting on begin! (Helleborus Yoke by Mathew Gnagy from Knitscene magazine)

Saturday, February 27, 2010

Happy 75th Birthday, Dad!

And Dad got his own pair of Fingerless Fetchings (modified and made a bit longer in the hand and in the thumb to fit man hands, and without cables) for his Birthday! Now he can stop stealing Mom's gloves! Happy Birthday Dad! I love you!

Saturday, February 20, 2010

Visiting Snohomish and Country Yarns

The cowl's a big hit!
Wearing the new cowl to visit the nearby quaint town of Snohomish today in the glorious sunshine! We took a walk along the Snohomish River. The Cascade mountain range was on display today and looked in fine form, snow topped and beautiful. I did try out some of the Java Inn coffee while in town. They have moved out of this building recently to a new location down the block...

I found some of the Mirasol "Hacho" merino wool that I like to make the "Baby Surprise Jacket" out of at the Country Yarns shop.


This was a great shop to visit and had very friendly staff and clientele. They also had a room in the back where they offer a place for spinning, as well as alot of beautiful locally dyed roving available for purchase, just ready for spinners.


A peek inside the shop!


And of course, a wall of wool, my personal favorite!


And that's about all I had time for since I had a half hour timeframe in which to shop! Yarn, coffee and sunshine...no better way to spend the day!